The British Tech Network is run by Ewen Rankin and started out mainly as a discussion network for computer enthusiasts. https://britishtechnetwork.com It is lovingly termed the BTN and the members discuss topics via the BTN Slack room. The network runs a weekly Mac Show and Big Show which is very popular with well over 20,000 subscribers. “The Photo Show” is also part of the British Tech Network. We cover news, kit and then discuss a topic. We have had guests on who have discussed subjects from wedding photography to portrait photography.
The Photo Show in full swing with Sarah Longes
The Photoshow is also popular and has around 6,000 views. Whilst Ewen started off the Photoshow he has now entrusted the project to small team of 4 people who are all enthusiasts when it comes to photography.
Martin who is an amateur photographer and a brilliant pub quiz organiser. His pub quizzes kept Sandy and I going through the first Lockdown in April 2020 and we are still doing them in the 2nd Lockdown. Then there is Ian Lewis who is an amateur photographer from Cornwall and lives amongst the most amazing scenery. There is Doddsie (Neil Dodds) who lives in Nyon, Switzerland who also has beautiful scenery to photograph. Finally there is me who enjoys a picture or two.
The BTN website with Tubemapper – Luke Agbaimoni – featured guest
We started off by ourselves and as we got more proficient, we invited guests. You will see in the recordings that both Luke Agbaimoni (@Tubemapper) and Sarah Longes have been on the show. Both were very entertaining, and Sarah has so much to talk about that we have made it into two shows. She covered such diverse topics especially mindfulness and dealing with adversity in your life. Even though she was shielded during the Lockdown, she still managed some amazing pictures.
The show is released as a podcast on a regular 2 weekly basis and is already receiving rave reviews for its content.
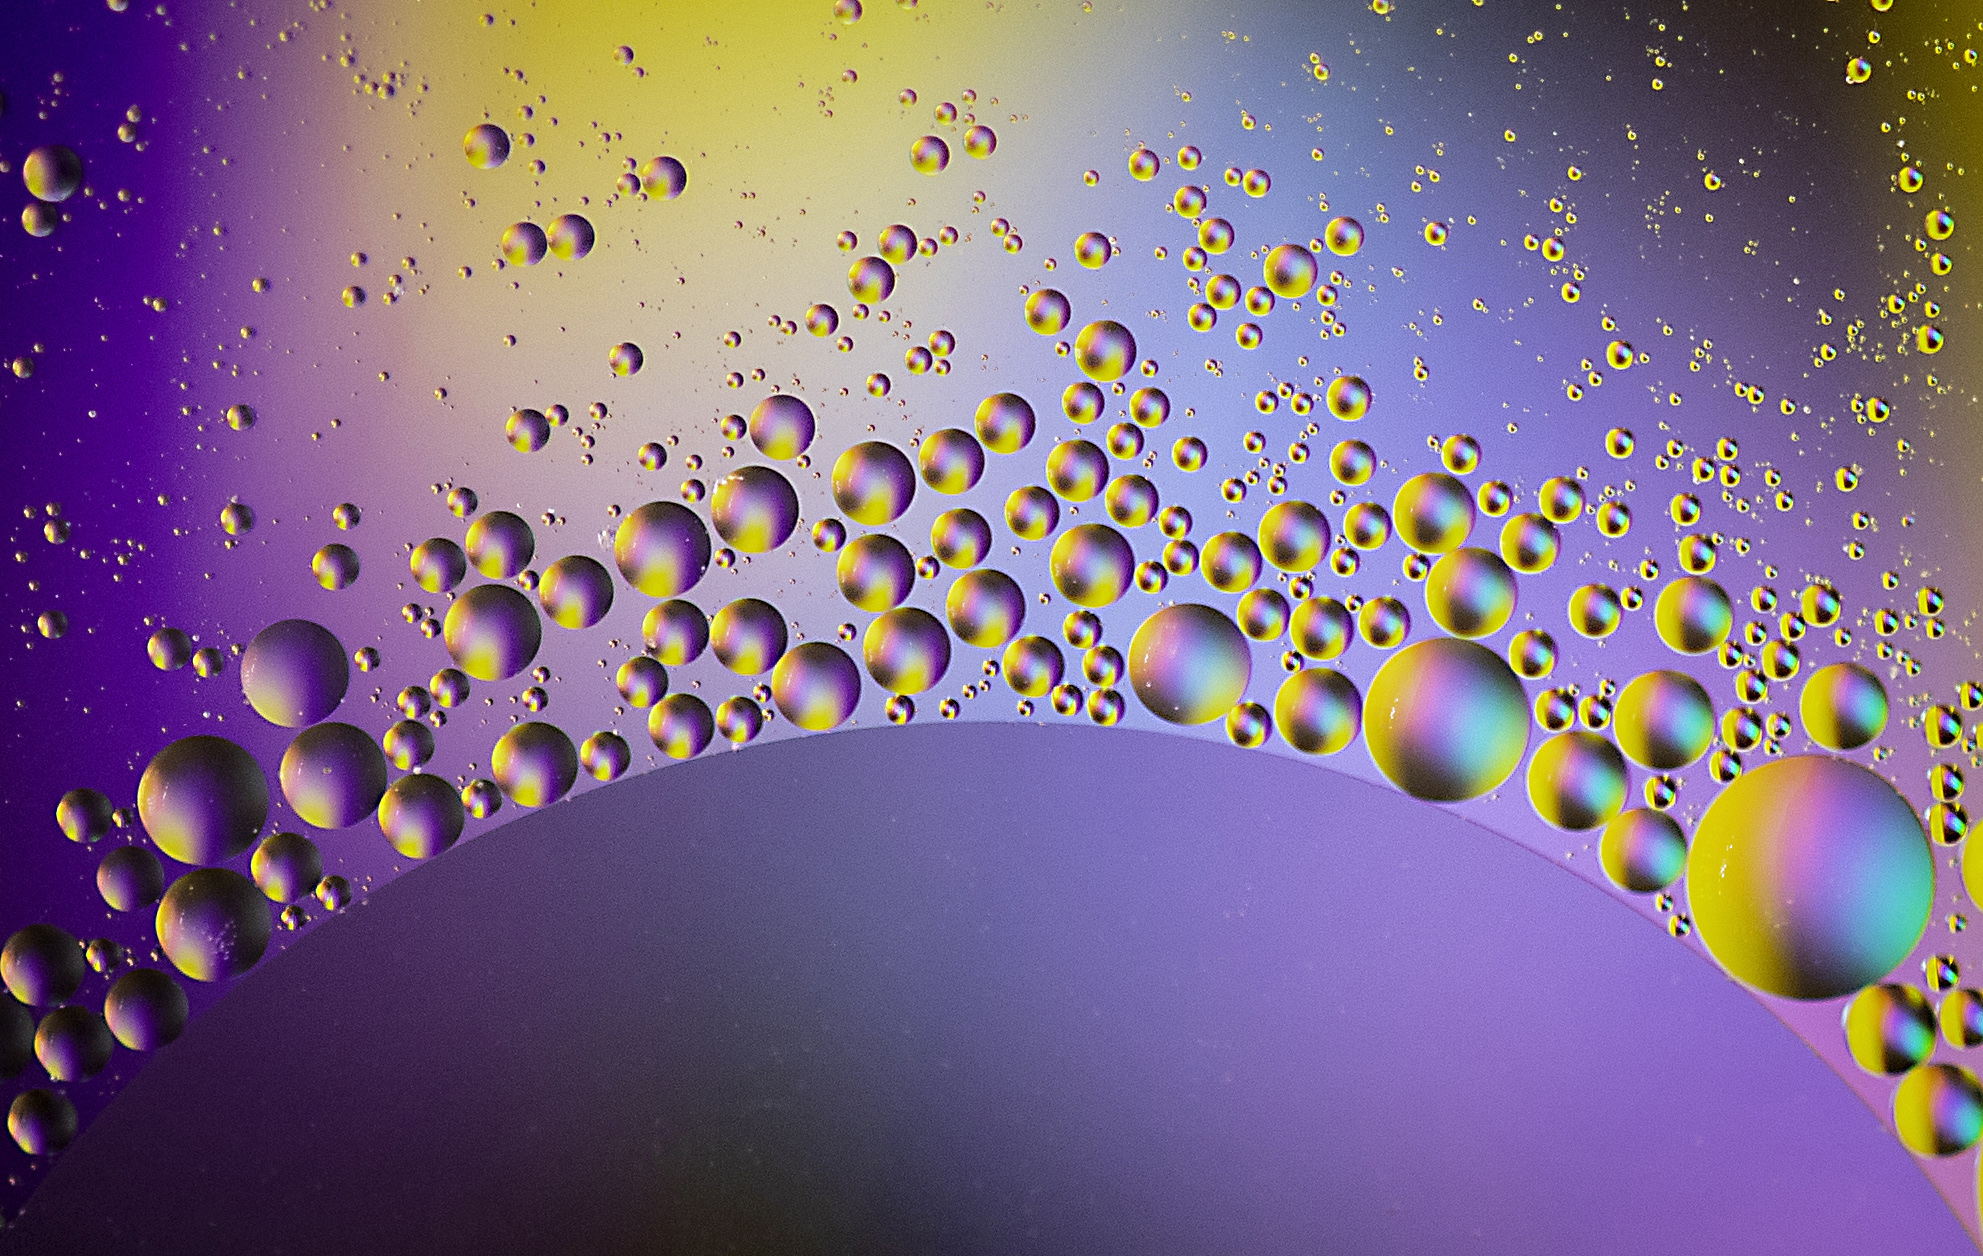
In the present lockdown situation, there has been the opportunity to take up different photographic projects that due to a busy lifestyle you would not normally have the time to complete. My photography revolves around my job which is travelling to conferences, my daily commute into Birmingham and the growing family. I have tried my hand at other forms of photography but not really had the time to look at it in detail. I belong to a photographic group which is part of the BritshTechNetwork and the convenor Ewen Rankin, a professional photographer has been setting us photographic tasks (https://www.britishtechnetwork.com/category/photo). These have been included water droplets and colourful reflections on the top of bubbles.
The one that I found fascinating was oil on water. I have revisited the technique a couple of times and I was very pleased that one of my pictures was selected in the Top 4 of a recent #ShareMondays2020 competition on Twitter. I therefore decided to write up how I obtained the colourful picture and show you how straightforward the technique can be. If done well it does produce very striking colourful abstract photographs.
Equipment
The set-up is fairly simple. You need a sturdy tripod with a horizontal arm that can help position the camera over the water. A good deep bowl is needed, here a glass Pyrex water jug is used. I have a small raised table that I use for my laptop work. The jug is placed on a colourful background on the table. In this case I have used a well-known children’s book and there is a patchwork of different colours that will provide an interesting background. A strong light source is needed and I have placed this to lean into the jug. Please be careful as there is a mix of electrical wires and water so do take the necessary precautions. The continuous light was provided by a Rotolight NEO2 set at an angle. My work table has some grooves which allowed the light to be stabilised at the base.
What is needed – Tripod, washing up liquid, Camera with macro lens, NEO2, Olive Oil, Colour background, teaspoon and water jug and small table to place jug on.Positioning the light against the jug of water placed on the background
Technique
A small amount of Olive oil is placed in a teaspoon and dropped onto the surface of the water. It is often difficult to make out the oil on the water so it is with careful trial and error that the macro lens is positioned to focus on the water surface and the oil. The teaspoon is also used to gently stir the water although later we agitate the surface more vigorously.
Camera settings
The camera used was a Canon D5 with a 100mm macro lens. The focus was set at f/2 which throws the background out of focus. I used a fast shutter speed (s/250) as the oil droplets will circulate quickly as it gets stirred up more and more. Using live view assists with the focussing. I upped the ISO to 800 so that I got a clear image on the back of the camera. I adjusted the set up so that I could bring a chair up close in order to sit comfortably and just concentrate on the photography. Manual focus was used throughout to ensure sharp pictures.
Advanced technique
After the oil is photographed then the next steps include adding washing up liquid to the water. This changes the surface tension of the water and introduces more shapes. It also creates more bubbles which can once again be guided by the teaspoon. Changing the firing mode to continuous shooting allows you to capture different combinations as the water moves around following stirring/agitation. Also remember to move, position or change the background to get different colour effects.
Processing
The pictures are uploaded into Lightroom for processing and you are free to follow your normal preferred settings. There may be a need for creative cropping to get the best abstract picture. I like looking at the shapes and the symmetry or just letting my artistic decisions rule my cropping. Two tips for oil and water pictures. Increase your saturation levels to a much higher setting than normal. The water absorbs the light and your pictures will initially look dull. Increasing the saturation compensates for this and gives pleasing results. I also move the picture into Photoshop where I apply an unsharp mask and adjust the levels to give the best exposure.
The saturation is increased to around 40 in Lightroom
Summary
This technique is straightforward and produces some stunning abstract photography that you will be proud to display on your monitor or on your wall. It is easy to set up and is a useful introduction into macro photography. Have fun and enjoy taking the photographs.
His argument is that once you have taken a good photograph then it needs to be finished. Ewen saw one of my images on Twitter and he messaged me saying the following: –
That one tweet led me into the world of the British Tech Network and I joined their Photo League. It is led by Ewen and you submit your monthly photographs and receive constructive comments. I have submitted my first few photographs and already benefited from the professional advice on how not only to compose but finish your image. I was still intrigued about the finishing of the image and so I spent a day with Ewen at his studio. He took me through several simple processes that make your images stand out. A few simple exercises cleaned the “grey crud” from my images and then with some sharpening process I could see that my images immediately benefitted from his advice. Here are a few images which have been processed in Photoshop and they have been enhanced.
My tips from that meeting with Ewen –
check your exposure,
add a touch of saturation,
look at the image and a touch of intelligent sharpening all add up to finishing your image.
Here are a few examples of checking your pictures and finishing them off.
Example 1 – this is a picture taken at Chesterton Windmill before Christmas.
—
The following is my attempt at processing
—
This next one is finished by following some simple rules and a bit of creativity. —
These next two are the before and after with a touch of blur.
—
……and that picture that first made me realise that there is more to just taking the photograph. Well here it is with a few added touches.
We use cookies on our website to give you the most relevant experience by remembering your preferences and repeat visits. By clicking “Accept”, you consent to the use of ALL the cookies.
This website uses cookies to improve your experience while you navigate through the website. Out of these, the cookies that are categorized as necessary are stored on your browser as they are essential for the working of basic functionalities of the website. We also use third-party cookies that help us analyze and understand how you use this website. These cookies will be stored in your browser only with your consent. You also have the option to opt-out of these cookies. But opting out of some of these cookies may affect your browsing experience.
Necessary cookies are absolutely essential for the website to function properly. These cookies ensure basic functionalities and security features of the website, anonymously.
Cookie
Duration
Description
cookielawinfo-checkbox-analytics
11 months
This cookie is set by GDPR Cookie Consent plugin. The cookie is used to store the user consent for the cookies in the category "Analytics".
cookielawinfo-checkbox-functional
11 months
The cookie is set by GDPR cookie consent to record the user consent for the cookies in the category "Functional".
cookielawinfo-checkbox-necessary
11 months
This cookie is set by GDPR Cookie Consent plugin. The cookies is used to store the user consent for the cookies in the category "Necessary".
cookielawinfo-checkbox-others
11 months
This cookie is set by GDPR Cookie Consent plugin. The cookie is used to store the user consent for the cookies in the category "Other.
cookielawinfo-checkbox-performance
11 months
This cookie is set by GDPR Cookie Consent plugin. The cookie is used to store the user consent for the cookies in the category "Performance".
viewed_cookie_policy
11 months
The cookie is set by the GDPR Cookie Consent plugin and is used to store whether or not user has consented to the use of cookies. It does not store any personal data.
Functional cookies help to perform certain functionalities like sharing the content of the website on social media platforms, collect feedbacks, and other third-party features.
Performance cookies are used to understand and analyze the key performance indexes of the website which helps in delivering a better user experience for the visitors.
Analytical cookies are used to understand how visitors interact with the website. These cookies help provide information on metrics the number of visitors, bounce rate, traffic source, etc.
Advertisement cookies are used to provide visitors with relevant ads and marketing campaigns. These cookies track visitors across websites and collect information to provide customized ads.